

If you’re new to equipment grouting, one of the first things you’ll discover is that getting grout to flow completely under a baseplate is harder than it looks. Tight gaps, long flow distances, and limited access points can all work against you. When a simple gravity pour isn’t enough, a headbox is one of the most practical tools you can use to achieve full coverage beneath the plate.
This guide explains what a headbox is, when to use one, and how to use it step by step.
Why Complete Bearing Area Is Non-Negotiable
Non-shrink grout does more than fill a gap. It transfers equipment loads into the foundation, distributes forces evenly across the bearing surface, and locks the machinery in place permanently. If grout doesn’t fill every void under the baseplate, those functions break down. You end up with stress concentrations, equipment movement, vibration problems, and in serious cases, structural failure.
The target for any equipment grouting installation is 98% or better effective bearing area. Your placement method is what gets you there.
What Is a Headbox?
A headbox is a formed reservoir built on one side of the baseplate, elevated above the grout space. You fill it with grout, and the weight of the fluid column above generates hydrostatic pressure that pushes material under the plate.
Think of it like filling a funnel. The height of grout in the box drives the flow beneath it. Typically, 12 to 18 inches of head generates enough pressure for most flowable grout applications.
This pressure helps grout:
- Push through tight clearances where drag from both the baseplate and foundation surface compounds
- Travel the full distance under larger machinery bases
- Displace air and avoid voids that a simple pour can’t reach
The headbox also gives you a built-in progress indicator. As long as grout is visible in the box, pressure is being maintained below. When you see grout return on the opposite side of the plate, you’re achieving coverage.
When to Use a Headbox for Baseplate Grouting
A headbox is the right choice when any of the following apply:
Clearances between 1 and 3 inches. In low-clearance situations, grout contacts both the baseplate above and the foundation below. The combined drag from both surfaces makes a simple gravity pour unreliable. Head pressure compensates for that friction.
Moderate to long flow distances. The further grout has to travel under a machinery base, the more energy it loses. Grout also stiffens as it moves. Consistent head pressure keeps it moving from start to finish.
Limited access points. When you can only pour from one or two locations, grout has to cover more ground on its own. A headbox extends its reach.
For clearances under 1 inch or installations with very complex geometries, head pressure alone may not be enough. In those situations, a pressurized headbox or pump grouting setup is worth considering.
Choosing the Right Grout Consistency
Selecting the right consistency is just as important as the placement method itself. There are three main options for pourable non-shrink grout.
Plastic (stiff). The thickest option. It holds its shape well and works for open, easy-access pours with short flow distances. It won’t travel far under a baseplate, so it’s a poor fit for most headbox applications.
Flowable. The most commonly specified type for equipment grouting and the best match for headbox use. It flows under its own weight when driven by head pressure, navigates around anchor bolts and embed plates, and holds together well enough to resist bleeding and segregation.
Fluid. Reserved for the toughest jobs with very low clearances or long, complex flow paths. Fluid grout achieves its flowability through higher water content, which often means lower compressive strength. A grout typically reaching 8,000 psi at plastic consistency might only reach 6,500 psi in fluid form. Always check the manufacturer’s data sheet to confirm your chosen consistency meets project strength requirements.
When in doubt, use the stiffest consistency that you can successfully get into place. Don’t default to fluid just because it seems easier.
Step-by-Step: Using a Headbox
1. Prepare the Foundation Surface
Good surface prep is what makes the grout bond hold long-term.
For cementitious grout, remove all oil, grease, and dust. Roughen the concrete surface to expose the coarse aggregate (ICRI CSP 6-9 is the recommended profile). Pre-soak the concrete with water for 8 to 24 hours before grouting, then remove any standing water before you pour.
For epoxy grout, surfaces must be completely dry since epoxy does not bond to moisture. Roughen the concrete, and prepare any steel surfaces to an SSPC-SP6 commercial blast finish.
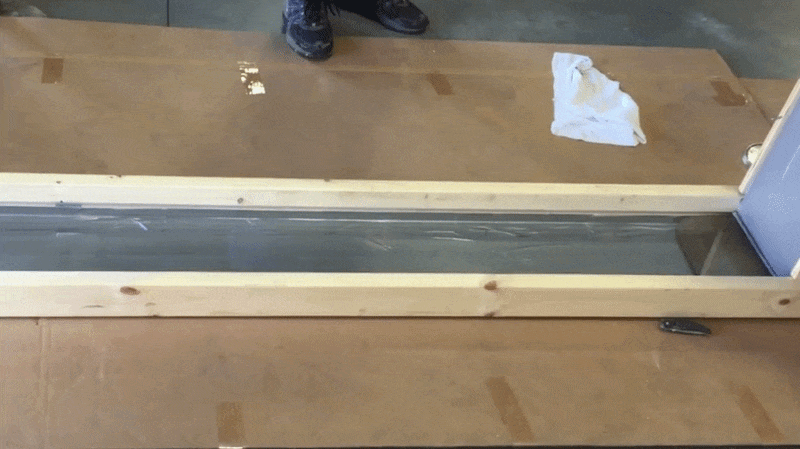
2. Build and Seal Your Forms
Your formwork contains the grout and gives the headbox something to work against. A reliable test: if your forms can hold water, they’ll hold grout.
Use rigid, liquid-tight materials and secure everything tightly to prevent leaks under pressure. Leave 1 to 2 inches of clearance around the baseplate for grout flow. Apply form release agent to any surfaces where you don’t want the grout to bond. For epoxy grout, use multiple coats of paste wax instead.
Designate one side as the pour side (where the headbox goes) and the opposite side as the vent side, where you’ll watch for grout return as confirmation of full coverage.
3. Build the Headbox
Construct the headbox on the pour side as an extension of your formwork, connecting directly to the grout space beneath the plate. It should hold enough volume to maintain a continuous head throughout the entire pour. Target 12 to 18 inches of grout column height above the baseplate. Keeping it full is what sustains the pressure driving flow below.
4. Mix the Grout
Mix immediately before placement. Grout that sits after mixing begins to stiffen and won’t flow as intended.
For cementitious grout, use a mortar mixer and mix for 4 to 5 minutes until smooth and lump-free. Use 7 to 11 quarts of water per 100 lb. bag and do not exceed the manufacturer’s maximum water limit. Adding extra water to improve flow will reduce final strength.
For epoxy grout, pre-condition all components to 70 to 80°F before mixing. Blend Component A (resin) and Component B (hardener) together first, then slowly add Component C (aggregate). Mix at low speed to avoid trapping air, and don’t over-mix.
5. Pour Continuously from One Side
Fill the headbox steadily and keep it full throughout the pour. Pour from one side only and let the grout push air ahead of it toward the vent side. Stopping and restarting allows air to get trapped behind the grout front, which creates voids. For epoxy grout, a plunger can help guide flow if needed.
Watch the vent side carefully, and pay attention to the corners. Grout returning at all four corners is your clearest confirmation of complete coverage under the plate.
6. Maintain Head Until the Grout Sets
Keep the headbox filled until the grout has begun to set and will no longer flow. If you let the head drop too early, the grout front can pull back and leave voids.
7. Cure the Grout
Improper curing is what turns a good looking pour into a short-lived equipment grouting installation.
For cementitious grout, wet cure for at least 3 days using damp burlap or plastic sheeting. After the first 24 hours, apply a curing compound that meets ASTM C 309. Protect the grout from direct sunlight, extreme temperatures, and loading until fully cured. Do not expose it to freezing temperatures before it reaches 1,000 psi.
For epoxy grout, no wet curing is needed. Keep surfaces clean and dry until fully cured and allow 24 to 48 hours before applying heavy loads. Keep temperatures between 55°F and 90°F during the cure period.
Make sure you follow the manufacturer’s recommendations on the datasheet for your specific grout.
8. Finish and Clean Up
Check equipment alignment and verify full grout coverage under the baseplate. For cementitious grout, trim excess material before it fully hardens. For epoxy grout, smooth exposed edges with a solvent-wiped trowel.
Clean your tools right away. Cementitious grout washes with water. Epoxy grout may require solvent or soap and water depending on the product. Check the datasheet for your specific material.
Frequently Asked Questions
Can I use a headbox with epoxy grout? Yes. A headbox is actually recommended for epoxy grout placement. Epoxy grout is self-leveling, but head pressure ensures continuous contact with the baseplate and helps displace air for full coverage.
What if grout doesn’t return on the vent side? Stop and assess. The grout may have stopped flowing due to excessive distance, a drop in head pressure, or the material beginning to set. Check that the headbox is still full and that your consistency was appropriate for the flow distance. In some cases, introducing grout from an additional access point may be necessary.
How is a headbox different from pump grouting? A headbox relies on gravity and the weight of the grout column to generate pressure. Pump grouting uses mechanical equipment to force grout under higher pressure, making it better suited for clearances under 1 inch or very long flow distances. A headbox is simpler to set up and works well for most standard machinery grouting applications.
Does using a headbox affect grout strength? No. The headbox is a placement method, not a mix change. As long as grout is mixed to manufacturer specifications, the consistency you select determines strength, not the use of a headbox.
Need Help With Your Next Grouting Project?
Whether you’re planning your first equipment grouting installation or troubleshooting a challenging one, we’re here to help. From product selection to placement method guidance, our team can walk you through the right approach for your specific conditions.
Contact us today to talk through your project with an expert.
